|
PARTONS
|
PARtonic Tomography Of Nucleon Software
|
 |
|
PARTONS
|
PARtonic Tomography Of Nucleon Software
|
 |
This tutorial demonstrates how to use Eclipse CDT IDE in your work with PARTONS. Eclipse is a very powerful tool that significantly improves the efficiency of code development. Due to the possibility of using plugins, Eclipse may be also used as a support for e.g. code commenting and version control.
If you are using our virtual machine, you may skip this section, as Eclipse provided there is fully configured to work with PARTONS. However, if you want to use your own installation, without the virtual machine, the tutorial found in this section will help you configure Eclipse properly.
You will need Eclipse (platform base), Eclipse CDT (support for C++) and EGit (plugin for Git revision control, if you want to clone the repositories directly from within Eclipse). On Linux systems, the installation of those components can be achieved by using the repositories:
For other Linux distributions and operating systems, some adjustments may be needed. You will need also all libraries required by the compilation of PARTONS. This subject is however covered in the installation tutorials of PARTONS on Linux or Mac.
In order to get PARTONS, you can either download the code manually or you can use Eclipse EGit plugin.
To download the code manually visit the Download page.
All PARTONS-related projects are equipped with Eclipse configuration files, so you can directly import them in Eclipse. To do so, use File > Open Projects from File System or File > Import > General > File System and choose the parent location of the projects. Select one or more entries from the list of detected projects and hit Finish.
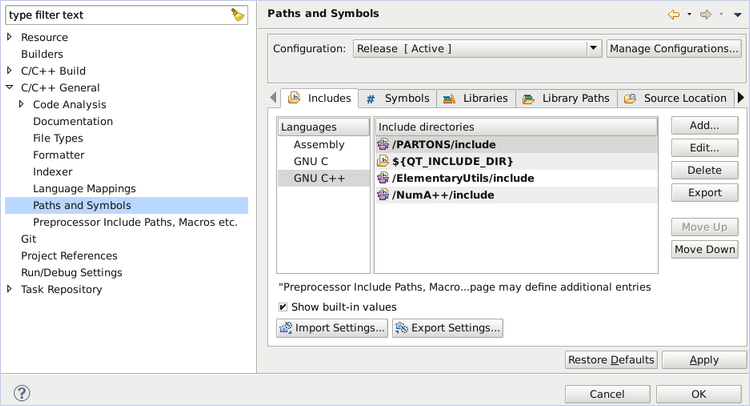
If you intend to work only on your own program, do not import all the projects in Eclipse. Instead, you can install the PARTONS libraries to your system by following the procedure described in the installation guide. In that case, you only need to configure Eclipse to understand the includes of the headers, by indicating where they have been installed. See the Troubleshooting section for more information. Note however, that we always recommend to import partons-example in Eclipse, so that you can adapt it to your needs and use it as a start for your own program.
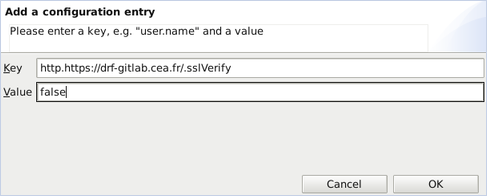
The PARTONS project uses the Git version control system. For users who wish to clone our Git repositories but do not have developer accounts, the authorization to our GitLab server on CEA can be done only via HTTPS protocol. However, you need to set up EGit (Eclipse Git plugin) to ignore SSL certificates, as the one issued by CEA is often not recognized properly. To do this, navigate through the Eclipse menu: Window > Preferences > Team > Git > Configuration > User Setting. Click on Add Entry button that will call a new window and set http.https://drf-gitlab.cea.fr/.sslVerify to false:

Click on OK button to close the new window, then hit Apply and again click on OK button to finish.
With EGit, it is useful to use the Git Repositories view. To enable it, navigate through the Eclipse menu: Window > Show View > Git Repositories (the last one may be hidden in Other).
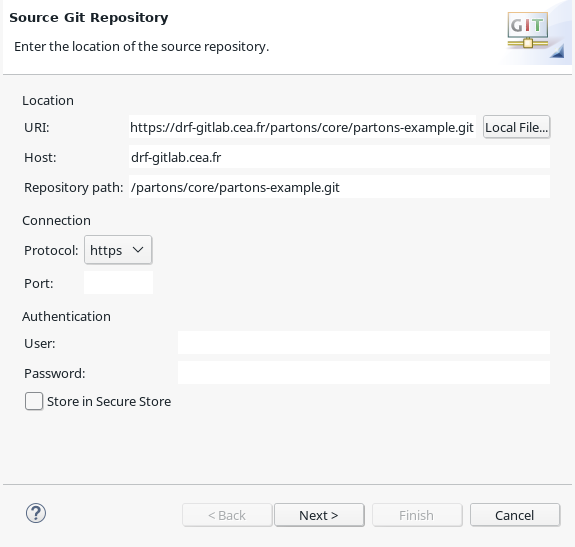
Once you have this Git Repositories view, click on Clone a Git Repository icon. In the new window, set URI to https://drf-gitlab.cea.fr/partons/core/partons-example.git. All other crucial elements should be filled automatically:

Click on Next button. You should be able to select now the branch that you want to download, most probably the one corresponding to the latest release of PARTONS. With the branch selected, click on Next button. Make sure that Import all existing Eclipse projects after clone finishes option is selected. Hit Finish. You should see now the imported project in the Project Explorer view. You can now follow partons-example as a template to build your own project on Eclipse.
If you wish also to contribute to the PARTONS libraries, we recommend to import them in the same way and develop in Eclipse. Repeat the procedure described above for the other PARTONS projects:
https://drf-gitlab.cea.fr/partons/core/elementary-utils.githttps://drf-gitlab.cea.fr/partons/core/numa.githttps://drf-gitlab.cea.fr/partons/core/partons.gitWhen you feel ready to push your contributions, you can either submit a patch, or ask for developer access (see the Contact page) to the repository (to be able to submit a merge request).
If you intend only to use these libraries, ignore the last paragraph. Just follow the procedure described in the installation guide to install the libraries, and see the Troubleshooting section to configure Eclipse with the location of the headers.
This step allows Eclipse to find external library headers used by PARTONS. Without this step, Eclipse will mark any code that is using an unrecognized library as a wrong one. Auto-completion of includes - a very useful tool - will not work properly either.
Navigate through the Eclipse menu: Window > Preferences > C/C++ > Build > Environment and add the variables indicated in the following screenshot. Note, that the paths to the libraries may be different on your system.

These variables are used by the configuration of PARTONS-related projects, as you can see by examining their Eclipse properties. Strictly speaking, not all variables are needed by each project, e.g. partons-example needs only QT_INCLUDE_DIR.
The build is based on CMake, which is a cross-platform make system. Make sure to have it installed on your computer (command cmake should be available in the terminal). If CMake is missing, we refer to the tutorials explaining the installation of PARTONS on Linux or Mac.
The build is automated by Ant scripts, which are small XML files scripting the call to cmake, make, etc. Those scripts are called build.xml and they can be found in each PARTONS project. Open Eclipse Ant view by navigating through the Eclipse menu: Window > Show View > Ant (the last one may be hidden in Other). Click on Add Buildfiles button, select and expand the list for the first PARTONS project, select build.xml and finish with OK button. Alternatively, you can also drag and drop build.xml file from the Project explorer view to the Ant view. Repeat this procedure for all other PARTONS projects if needed.
You can build now each of PARTONS projects separately. Just remember to do this in the following order: 1) elementary-utils, 2) numa, 3) partons, 4) partons-example. In the Ant view, expand a given entry, and double click to perform one of the available operations:

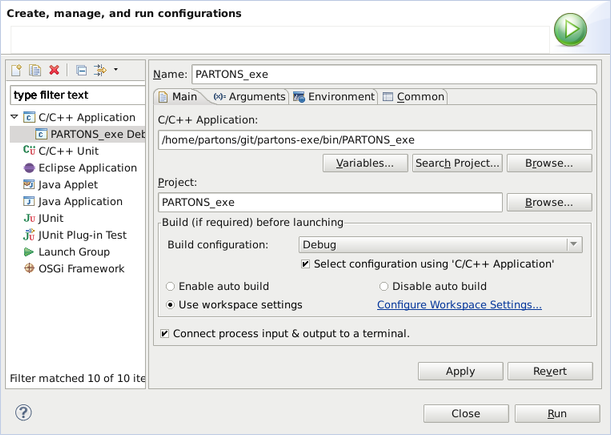
If you prefer not to use the console, you can run PARTONS within Eclipse. To achieve this, right-click in the Project Explorer view on the name of your PARTONS executable project (PARTONS_example or your own project) and select: Run As > Run Configurations. A new window will appear. Select C/C++ Application in the list on the left side of this window and press on New lunch configuration button. Set C/C++ Application to PARTONS_example executable file in bin folder:

In the Arguments tab you can specify arguments passed to the executable, e.g. a path to an XML scenario that you want to run. Click on Apply button and Run if you want to run PARTONS immediately. Later, use Run icon in Eclipse menu whenever you want to run PARTONS (you may need to customize the toolbar to make this icon visible).
/usr/local/include/PARTONS, if you used the default installation location). The default links that can be seen in the screenshot below use the Eclipse workspace projects and therefore are not useful with the system installation. You can remove them, but do not remove the global variables such as ${QT_INCLUDE_DIR}!.
eclipse-jdt (a dependency of eclipse) should provide it.cmake via Ant scripts: cmake executable, most likely /usr/local/bin. Unless CMake is installed in a custom place, you can get this path by running PATH variable modified, click on Apply button and Close to finish. 
Ctrl+Shift+F) modifies files for no reason, it probably changes the way indentations are handled (white spaces or tabulations). Navigate through the Eclipse menu: Windows > Preferences > C/C++ > Code Style > Formatter. Click on Edit button and make sure that Tab policy is set to Spaces only. If this is not the case, change it (you may need to create a new profile).These shortcuts are essential and can be used each time you modify a file:
Ctrl+Shift+F: call to the formatter; Eclipse handles indentation and spacing automatically.Crtl+/: Comment/uncomment selected block of code.Shift+Alt+R: Renaming of class, variable, etc. Eclipse will propagate your change to the whole workspace (handy it case of structural change that needs to be propagated to other projects).Ctrl+Shift+O: Eclipse handles includes automatically (yes, it generates the includes for you!).Ctrl+Space: Auto-completion (very handy!).The last two will work correctly only if the indexer of Eclipse is up-to-date. You can update it by right-clicking on a given project, then choosing: Index > Rebuild. This can be also useful when Eclipse signals some errors in the code, due to a recent change in one of the dependent projects. You also need the headers location to be configured properly (see the Troubleshooting section).